Sunday, November 14, 2010

Week 5 - Composition

This week's subject is/was composition; how you actually frame the subject within the photo. I actually had a LOT of trouble with this assignment! I can't decide why exactly... I think it's a combination of things. First, this is something I'm really comfortable with already, that comes pretty naturally to me, so it's hard to switch to where I'm consiously thinking about it. Also, the assignment was so vague, I had trouble deciding what to do! LOL
The white balance assignment was simple; set an object on the table and take some pictures of it. Same with the aperture one... this is totally open to interpretation, so I had trouble deciding which direction to head in!
In a perfect world, I would have done a shoot with Max; well dressed, clean faced, and just run through the six assigned objectives.
As we all know, none of live in a perfect world, so I've had to make do! Boogery faced Max, a coffee cup, and some pictures I had taken previously are the elements that came together to complete this assignment!

First, the pictures I did manage to get "on purpose" for this challenge:
Fill the Frame
Image shot at f/4.5, ISO 800, 18-70mm @ 70mm

Rule of Thirds
Image shot at f/4.5, ISO 800, 18-70mm @ 48mm

Horizon Line / Rule of Fifths
Image shot at f/3.8, ISO 400, 18-70mm @ 22mm
And in the interest of full disclosure, I Photoshopped the *hell* out of this picture, because I'm not generally a fan of sunflare/glare, and I wanted to get as much of that effect out of it as I could. I actually think it turned out kind of cool! If you'd like to see the SOOC shot, click here


And then here are some older/not taken on purpose photos that fit the specs of the assignment:
A New Perspective
We took Max to the beach last month; my instinct and first inclination is to shoot stuff like this:

Image shot at f/10, ISO 800, 18-55mm @ 52mm
He's my kid, after all, so I want to get good shots of *him*
But look what happens when I make him smaller in the frame, zoom back out, and hold the camera horizontal:

Image shot at f/13, ISO 800, 18-55mm @ 18mm
It's not just about Max anymore, but about the scene surrounding him as well.

Frame Your Subject Image shot at f/6.3, ISO 1600, 18-55mm @ 18mm


Keep it Simple
This picture could easily have gone horrible awry; see the little triangle of bench in the bottom left corner? It's attached to a picnic table that is *covered* with food, toys and other detritus. By positioning myself so that that mess is cropped out, I got a darling shot of the boys!
Image shot at f/10, ISO 400, 18-55mm @ 32mm

Friday, November 12, 2010

"Morning"

The inspiration word for this week was "Morning" and I knew right away I wanted to get some of Max's morning routine; he always sits like this while eating his Cherrios and banana, and he has some quality bedhead!


Images shot at f/7.1, ISO 800

Tuesday, November 9, 2010

"Taking it Old School"

The challenge for this week was to apply some "old school" effects to a current digital photo. In keeping with the theme, I chose to shoot one of Jamie's "old school" coffee grinders. I had a few plays with this one, just because I was having so much fun!
So here are a few versions with various film effects applied:


And now, for a little "behind the scenes" information... here's what the image looked like, SOOC (Straight Out Of Camera): I used a couple sheets of my scrapbooking cardstock for the background, and then strategic cropping and Photoshopping to make it appear seamless. I'll definitely be using this method in the future to photograph small objects, so it gives me almost limitless options for colors! Goodness knows I have enough scrapbook paper!

And then here's what it looked like after making the ACR and Photoshop adjustments (where I started to then add the film effects):


Image shot at f/7.1, ISO 800, 18-70mm @ 40mm

Monday, November 8, 2010

Adding Texture in Photoshop

I've long been fascinated by the look of textures on photos; the effect can vary from grunge-y to Victorian to graphic to...only your imagination is the limit!
I'd never made an effort to actually play with them, though, because I never felt like my photos were right for them! But again, the purpose of this blog is to add to my knowledge and skillset, so I might as well play with them, right?

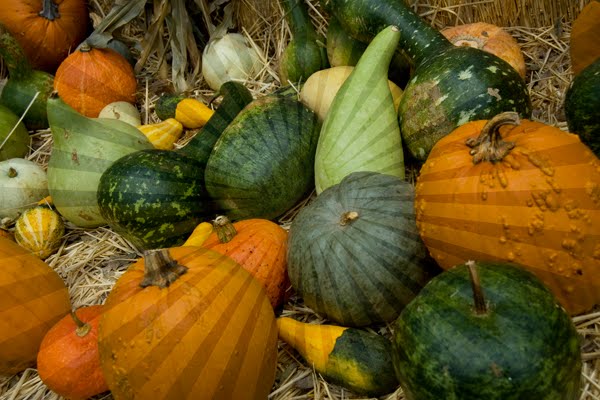
This is a photo I shot at the pumpkin patch over the weekend Shot in RAW at f/6.3, ISO 400, 1/160 SS, 18-55mm @ 30mm

Bringing it into Photoshop, with all RAW setting zero'ed out:

The original image with some ACR (Adobe Camera Raw) adjustments made:

From here, I started adding some different textures to see what they do to the photos; all of these textures were found on Flickr, using the Advanced Search. (Make sure to click the "Creative Commons" licensing button at the bottom, so you can be sure you have permission to use the photos!) If you're already confused, go here for a super easy explanation on how to use textures! Seriously, it's like 3 steps!
Several of these aren't things I'd ever actually use, but for the purposes of this blog entry, I wanted a variety of options, so I'm going to go ahead and include them.

OK, so on to my experiments...


You can also layer the textures together to get even more options! For this one, I used two; the first and fourth ones shown above. I used a fabric texture first, to give the whole photo a nice rich texture and sheen, and then the radiating burst just added a little *oomph* to bring the focus to their faces!

So that's the super mega basics of using textures in Photoshop! I'd love to see what you come up with too!

Sunday, November 7, 2010

"Around and Around"


Image shot at f/4.5, ISO 1600 18-70mm @ 35mm
I had some trouble with this challenge prompt; I had lots of ideas, and no realistic ways to execute them. I wanted a spinning record, but have no record player. I wanted something at the end of a string, caught in motion, shot as a long exposure, but I have no tripod and no willing model/assistant to do the spinning for me... Lots of ideas, but nothing concrete enough to actually set up and shoot.
We woke up to pouring down rain this morning (as I mentioned in my previous post) so Jamie decided to make a big batch of chili for this week; as I was helping him straighten up the kitchen (he's an amazing cook but makes SUCH a mess! LOL) I was noticing all the empty cans and the pot and thought "Hey! These are all round!" so he helped me set up the shot. How did he help me, you ask? Well, we have a microwave over our range, so I couldn't get the camera right where I wanted it, at the angle I wanted. He went and borrowed our downstairs bathroom mirror! Check out the pullback:

Week 4 - Flash

The assignment: To demonstrate how flash can be used in situations other than just darkness, the actual assignment was actually three parts, but due to uncooperative weather, I couldn't really do all three, so I just did one... use fill flash to combat a backlit subject.
It's pouring down rain here this morning, and Max is napping, so I set up this little toy still life instead... it's under the overhang in our backyard, with decent light outside, but raining... not usually good, but great for creating a backlit situation! LOL

This was shot with the camera on "Auto" mode: f/4.5, ISO 560, 18-70mm @ 70mm


Shot at f/4.5, ISO 800, 18-70mm @ 70mm


And then here I left the settings the same as above, but forced the flash to go off, brightening up the dark foreground and filling in the shadows.
Image shot at f/4.5, ISO 800, 17-70mm @ 70mm

Saturday, November 6, 2010

"The Little Things"


The challenge was for "The Little Things" so I chose to shoot Max's "collection" of Chuck Taylor's. Jamie and I decided a long time ago that Max would always have a pair of Chucks in his closet, starting with his first pair, crib shoes that he had at about 6 months old! Now he's only weeks away from outgrowing his most recent pair... time to start shopping for new ones! Maybe for Christmas...
Image shot at f/4.5, ISO 400, 18-70mm @ 56mm